Thank You to my Friends and Followers!

Wednesday, January 31, 2018

Butterfly Wishes Card

 
Hello and welcome to all things beautiful! 
I am so glad you've stopped by for a visit. 
I hope you are inspired and learn a trick or two. For today's card I pulled out various coordinating stamps. All the products I used on this card will be listed below.


Products:
Stampin' Up Flourishing Phrases Stamp Set
Stampin' Up    Stamp Set
Gina K Designs Black Onyx and Peach Bellini Ink
Stampin' Up Butterfly Punch


Have a wonderful day!

Thank you to my followers for always checking out my latest creation and Thank you if your visiting. Please consider following me. If you become a follower I'll send you a shout out on this weeks Feature Friday post and link your blog so others can visit you too. Oh and how could I forget--you'll be entered in my BLOG CANDY drawing.  Next drawing when I reach 250 followers!!!!!
( Unfortunately, there are some who have not posted in the comments or sent me the link to their blog in an email. I will not be hunting for your blog so if you don't post your blog address I won't be able to link it up)


Monday, January 29, 2018

Apple Over Window Card

Happy Monday!
I am so glad you stopped by to see my latest post.
This card is using a new to me technique. If you'd like to try this fancy fold card technique you can find a tutorial under my tutorial tab here.

For this card, I used my Cricut to cut the layered apple image. I left a blank piece of cream cardstock for a handwritten message. I'm still trying to keep my crafting new years resolution of making a matching envelope and card front/inside.


Hope you enjoyed my post and try making an over window card for yourself. 
See the products used below.

Products:
Gina K Designs  Kraft & Dark Chocolate cardstock 
Crate paper Farmhouse 6x6 patterned paper stack
Gina K Designs Fadded Brick ink
Cricut Plantin Schoolbook cricut cartridge - Apple cut at 2 inches
Hero Arts Envelope pattern woodblock stamp
Hero Arts Say It All stamp set
Gina K Designs Cherry red & Jellybean ink
Hampton Arts doodlepops stamp set
ribbon


Have a wonderful day!

Thank you to my followers for always checking out my latest creation and Thank you if your visiting. Please consider following me. If you become a follower I'll send you a shout out on this weeks Feature Friday post and link your blog so others can visit you too. Oh and how could I forget--you'll be entered in my BLOG CANDY drawing.  Next drawing when I reach 250 followers!!!!!
( Unfortunately, there are some who have not posted in the comments or sent me the link to their blog in an email. I will not be hunting for your blog so if you don't post your blog address I won't be able to link it up)

Saturday, January 27, 2018

Vintage Camera Greeting Card

Welcome to All Things Beautiful!
 So glad you are visiting this Saturday! 
One of my 2018 crafting goals is to create card fronts, insides and envelopes all to coordinate. to accomplish this goal I have been taking the extra steps to coordinate all the elements in my card making designs.

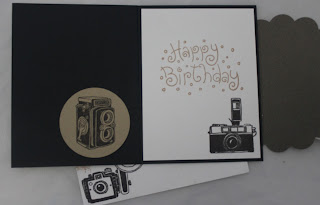
For today's card, I created a masculine vintage camera design, including matching elements on the card inside and on the mailing envelope. 
This card uses a new card fold to me...a circle enclosure fun fold. You can find the tutorial on how to make this card under my tutorial tab here along with lots of other fun card making tutorials, techniques and card folds.

Because this is a masculine design I chose to use neutral colors and keep the design rather simple.


For the inside I choose other vintage camera stamps from the stamp set to add some interest.


Products:
Gina K Designs Black Onyx card stock and ink
MME Dolled Up 6 x 6 paper stack
Spellbinders Standard Circle dies
Gina K Designs Kraft card stock and ink
Close To My Heart Life in Pictures stamp set
Stampin' Up You've Got This stamp set
Recollections Doodle birthday stamp set


If you give this fun fold a try leave a comment below letting me know. I'd love to see a picture of your card creation!

I hope you have a great weekend!

Thank you to my followers for always checking out my latest creation and Thank you if your visiting. Please consider following me. If you become a follower I'll send you a shout out on this weeks Feature Friday post and link your blog so others can visit you too. Oh and how could I forget--you'll be entered in my BLOG CANDY drawing.  Next drawing when I reach 250 followers!!!!!
( Unfortunately, there are some who have not posted in the comments or sent me the link to their blog in an email. I will not be hunting for your blog so if you don't post your blog address I won't be able to link it up)

Thursday, January 25, 2018

Yellow Peek-a-Boo Shutter card


Hello and welcome to All Things Beautiful!
Today I am showcasing a Peek-A-Boo Shutter card.

This is my first attempt at making one of these types of cards. If you''d like to try this technique you can find the tutorial I used under my tutorial tab here.


 I choose to use 2 colors of cardstock to give a slight bit of interest but to also keep the card simple.

 I thought I would stamp the sentiment along side some image stamps . I used masking for the peek-a-boo flower image. I masked the flower and added the leaves.


Products:
Gina K Designs White cardstock, Green Asperagus ink & Sweet Corn cardstock and ink
Spellbinders Decagons dies
MME Moments 6x6 patterned paper stack
Stampin' Up Fabulous Florets stamp set
Stampin' Up Georgeous Grunge stamp set
Stampin' Up Butterfly basics stamp set

I hope you try this shutter card for yourself. It is a fun and easy card to complete.

Have a wonderful day!

Thank you to my followers for always checking out my latest creation and Thank you if your visiting. Please consider following me. If you become a follower I'll send you a shout out on this weeks Feature Friday post and link your blog so others can visit you too. Oh and how could I forget--you'll be entered in my BLOG CANDY drawing.  Next drawing when I reach 250 followers!!!!!
( Unfortunately, there are some who have not posted in the comments or sent me the link to their blog in an email. I will not be hunting for your blog so if you don't post your blog address I won't be able to link it up)

Tuesday, January 23, 2018

Dragonfly Card Candy

   
Hello and welcome to all things beautiful! 
I am so glad you've stopped by for a visit.
 I hope you are inspired and learn a trick or two. For today's project i grabbed some pattern paper and card stock scraps to create this fun card candy that is great for embellishments on cards, scrapbook layout or any other paper project.


Have a wonderful day!

Thank you to my followers for always checking out my latest creation and Thank you if your visiting. Please consider following me. If you become a follower I'll send you a shout out on this weeks Feature Friday post and link your blog so others can visit you too. Oh and how could I forget--you'll be entered in my BLOG CANDY drawing.  Next drawing when I reach 250 followers!!!!!
( Unfortunately, there are some who have not posted in the comments or sent me the link to their blog in an email. I will not be hunting for your blog so if you don't post your blog address I won't be able to link it up)

Wednesday, January 17, 2018

Sunny Birthday Wishes


Hey there and thank you for visiting my blog today!
 For today's Card  post I have created a clean and simple birthday card for you.


Products:
Gina K Designs Asparagus and Sweet Corn Dye Ink
Gina K Designs   Stamp Set
6x6 Pattern Paper Stack
MFT Polka Dot Stencil
Texture Paste

Have a wonderful day!

Thank you to my followers for always checking out my latest creation and Thank you if your visiting. Please consider following me. If you become a follower I'll send you a shout out on this weeks Feature Friday post and link your blog so others can visit you too. Oh and how could I forget--you'll be entered in my BLOG CANDY drawing.  Next drawing when I reach 250 followers!!!!!
( Unfortunately, there are some who have not posted in the comments or sent me the link to their blog in an email. I will not be hunting for your blog so if you don't post your blog address I won't be able to link it up)


Monday, January 15, 2018

Puppy Love Z-Fold Suspended Spinner Card

Hi There! Welcome to All Things Beautiful!
 I am so glad you stopped by for a visit.

Today's post is a Z-fold Suspended Spinner card. If you'd like to learn how to make this type of card you can find a tutorial under my tutorial tab or click here.

I used the same stamp set for the card and the envelope.


 Here is the inside view. I used some left over patterned paper for the half circle for some interest on the card inside.


Products:
Gina K Designs Black Onyx cardstock and ink
Lawn Fawn Perfectly Plaid 6x6 paper stack
Spellbinders Standard Circles dies
Stampin' Up Bella & Friends stamp set
Gina K designs Sky Blue ink
My Favorite Things Mirror Image stamp
Copics C1, C3, C5, R20, R23, B63, B66
Catherine Pooler Butterfly notes stamp set
clear thread


I hope you try this spinner card.

Have a wonderful day!

Thank you to my followers for always checking out my latest creation and Thank you if your visiting. Please consider following me. If you become a follower I'll send you a shout out on this weeks Feature Friday post and link your blog so others can visit you too. Oh and how could I forget--you'll be entered in my BLOG CANDY drawing.  Next drawing when I reach 250 followers!!!!!
( Unfortunately, there are some who have not posted in the comments or sent me the link to their blog in an email. I will not be hunting for your blog so if you don't post your blog address I won't be able to link it up)

Saturday, January 13, 2018

Masculine Matchbook Card

Welcome to All Things Beautiful!
 So glad you are visiting today! 
One of my 2018 goals is to create card fronts, insides and envelopes all to coordinate. This is one of my first projects to accomplish that goal.

In today's post I'm sharing a fun fold card. 
It's a Matchbook style card. With this type of card you can tuck in a gift card, a quote card or even some cash inside just under the flap.


For this card I grabbed lots of stamp sets. For the front panel I stamped various border stamps to create this pattern. I also used a stencil and did tone on tone for the background


This card is for my son so I decided to stamp a journaling panel stamp so I could hand write a special birthday message inside. I added some washi on the edge of the matchbook flap and used the same stencil to color the front of the envelope.


Here is a close up of the stamped panel using various border stamps


Products:
Gina k Designs Lots of Washi Stamp Set
Gina K Designs Pleasant Plurals Stamp Set
Gina K Designs Pretty Paterns Stamp Set
Gina K Designs Kraft Cardstock
Gina K Designs Kraft and Black Onyx Ink
Catherine Pooler Checkerboard Stencil
washi

Now it's your turn to go make something beautiful and Have a wonderful day!

Thank you to my followers for always checking out my latest creation and Thank you if your visiting. Please consider following me. If you become a follower I'll send you a shout out on this weeks Feature Friday post and link your blog so others can visit you too. Oh and how could I forget--you'll be entered in my BLOG CANDY drawing.  Next drawing when I reach 250 followers!!!!!
( Unfortunately, there are some who have not posted in the comments or sent me the link to their blog in an email. I will not be hunting for your blog so if you don't post your blog address I won't be able to link it up)

Thursday, January 11, 2018

Simple Thanks

Welcome to All Things Beautiful!
 So glad you are visiting today! 

In today's post I am sharing a fairly clean and simple card although there is lots of texture.


Products:
Martha Stewart Punch
Gina K Designs gingham ribbon
Pretty Pink Posh sequins

Your turn to go make something beautiful!
Have a wonderful day!

Thank you to my followers for always checking out my latest creation and Thank you if your visiting. Please consider following me. If you become a follower I'll send you a shout out on this weeks Feature Friday post and link your blog so others can visit you too. Oh and how could I forget--you'll be entered in my BLOG CANDY drawing.  Next drawing when I reach 250 followers!!!!!
( Unfortunately, there are some who have not posted in the comments or sent me the link to their blog in an email. I will not be hunting for your blog so if you don't post your blog address I won't be able to link it up)

Monday, January 8, 2018

Citrus Stationary Box

Hi There! Welcome to All Things Beautiful!
 I am so glad you stopped by for a visit.

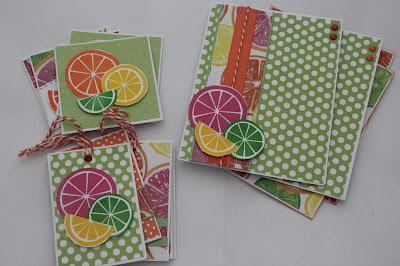
Today's post is a stationary box. I recently discovered a tutorial on Youtube for this little gem. You can find the link to the tutorial I used under my tutorial tab or by clicking here. I couldn't help myself but to make a few more of these and will post them in the next few weeks. I'll link the posts under my tutorial tab once they have posted so check back soon!

I was so excited to find this tutorial. It has been a long while since I've made something new.

I love how this opens up to reveal all the paper yummy goodness!
This stationary box holds 6 A2 cards and envelopes, 6 3x3 sized cards and 6 tags. All coordinated with the box. How cool is that?!

Here is a pic of my coordinating set.

I hope you try this stationary box for yourself. It is a bit time consuming but Oh so worth the effort.

Have a wonderful day!

Thank you to my followers for always checking out my latest creation and Thank you if your visiting. Please consider following me. If you become a follower I'll send you a shout out on this weeks Feature Friday post and link your blog so others can visit you too. Oh and how could I forget--you'll be entered in my BLOG CANDY drawing.  Next drawing when I reach 250 followers!!!!!
( Unfortunately, there are some who have not posted in the comments or sent me the link to their blog in an email. I will not be hunting for your blog so if you don't post your blog address I won't be able to link it up)

Friday, January 5, 2018

Gold Foiling


 Hello and welcome to All Things Beautiful!
Today I am showcasing a foil card. I've had my Minc machine for a few years but haven't really experimented with it in a few years. It was definitely time to break out my MINC!


I used a Youtube video to help me with some DIY toner ink to help create this card. You can find the Youtube video I used under my Tutorial tab or by clicking here.

Products:
Stampin' Up Stamp Set
Anna Griffen Gold Foil
Pretty Pink Posh Gold Sequins
Ranger Black Embossing powder
Gina K Designs Cardstock in Kraft and Black Onyx


Have a wonderful day!

Thank you to my followers for always checking out my latest creation and Thank you if your visiting. Please consider following me. If you become a follower I'll send you a shout out on this weeks Feature Friday post and link your blog so others can visit you too. Oh and how could I forget--you'll be entered in my BLOG CANDY drawing.  Next drawing when I reach 250 followers!!!!!
( Unfortunately, there are some who have not posted in the comments or sent me the link to their blog in an email. I will not be hunting for your blog so if you don't post your blog address I won't be able to link it up)

Wednesday, January 3, 2018

Pink Pocket Letter

Welcome to my little space on the blog sphere!
 I hope your day is going well and you are finding some time to be creative.
Today is a quick post.

Today's post showcases a pocket letter I made for a swap over at Pocket Letter Pals.
The theme if you haven't guessed yet was pink!

The nice thing about Pocket Letters is that you can use the little embellishments left over from a sticker pack or small bits of paper scraps to create something really nice for someone.

I love the color oink so it wasn't hard to grab some papers and embellishments from my stash and create this Pocket Letter. 
If you haven't heard of pocket letters yet check out the tutorial I have under the Tutorial tab on my blog up at the top or click here. Scroll until you find the Pocket letter tutorial.


Have a wonderful day!

Thank you to my followers for always checking out my latest creation and Thank you if your visiting. Please consider following me. If you become a follower I'll send you a shout out on this weeks Feature Friday post and link your blog so others can visit you too. Oh and how could I forget--you'll be entered in my BLOG CANDY drawing.  Next drawing when I reach 250 followers!!!!!
( Unfortunately, there are some who have not posted in the comments or sent me the link to their blog in an email. I will not be hunting for your blog so if you don't post your blog address I won't be able to link it up)

Monday, January 1, 2018

Fun Rainbow Card

Hi There and Happy New Year!
Welcome to All Things Beautiful!
Today's post is a fun Rainbow card.


For this card I used a stencil and my Tim Holtz distress inks.


Products:
Ranger Distress inks  
Stampin Up Corner Garden Stamp Set
Black ribbon from Michaels Arts & Crafts
white Perla beads made into enamel dots
Gina K Designs Luxury cardstock in Black Onyx and White
Stampin' Up Flourishing Phrases Stamp Set

Haooy new Year and Have a wonderful day!

Thank you to my followers for always checking out my latest creation and Thank you if your visiting. Please consider following me. If you become a follower I'll send you a shout out on this weeks Feature Friday post and link your blog so others can visit you too. Oh and how could I forget--you'll be entered in my BLOG CANDY drawing.  Next drawing when I reach 250 followers!!!!!
( Unfortunately, there are some who have not posted in the comments or sent me the link to their blog in an email. I will not be hunting for your blog so if you don't post your blog address I won't be able to link it up)